Subscribe to our ▶️ YouTube channel 🔴 for the latest videos, updates, and tips.
Construction of Angles by using Compass
In construction of angles by using compass we will learn how to construct different angles with the help of ruler and compass.
There are some angles of special measures which can be constructed without use if protractor. Let us discuss a few here to learn how to construct them.
1. Construction of an Angle of 60° by using Compass
Step of Construction:
(i) Draw a ray OA.
(ii) With O as centre and any suitable radius draw an arc above OA cutting it at a point B.
(iii) With B as centre and the same radius as before, draw another arc to cut the previous arc at C.
(iv) Join OC and produce it to D.
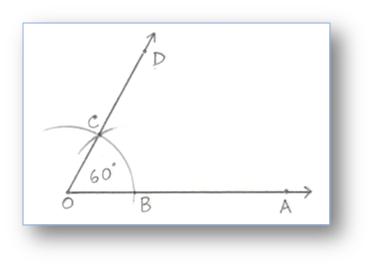
Then ∠AOD = 60°.
Working Rules to Construct an Angle Measuring 60°.
Given: AB be the given line with point O.
To Construct: Draw a ray OC such that COB is 60°.
Step I: Draw a line AB and mark the point O an it.

Step II: Draw an arc using O as centre cutting \(\overrightarrow{OB}\) at M.
Step III: Now, use M as the centre and \(\overrightarrow{OM}\) as radius, draw another are cutting the previous arc at N.

Step IV: Join O and N and produce it to form \(\overrightarrow{OC}\).

Step V: Now, ∠COB is the required angle whose measure is 60°.
2. Construction of an Angle of 120° by using Compass
Step of Construction:
(i) Draw a ray OA.
(ii) With O as centre and any suitable radius draw an arc cutting OA at B.
(iii) With B as centre and the same radius cut the arc at C, then with C as centre and same radius cut the arc at D. Join OD and produce it to E.
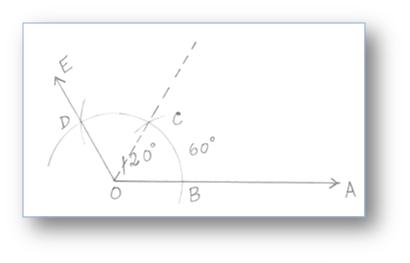
Then, ∠AOE = 120°.
Working Rules to Construct an Angle Measuring 120°.
Step I: Draw a line AB and mark the point O on it.
Step II: Draw an arc using O as centre cutting \(\overrightarrow{OB}\) at M.
Step III: Now, use M as the centre and \(\overline{OM}\) as radius, draw another arc cutting the previous arc at N.

Step IV: Now, take N as the centre and keeping the radius same (\(\overline{OM}\)), mark another arc cutting at T.

Step V: Join \(\overline{OT}\) and produce it to form the ray OE.

Step VI: Now, ∠EOB is the required angle measuring 120°.
3. Construction of an Angle of 30° by using Compass
Step of Construction:
(i) Construction an angle ∠AOD = 60° as shown.
(ii) Draw the bisector OE of ∠AOD.
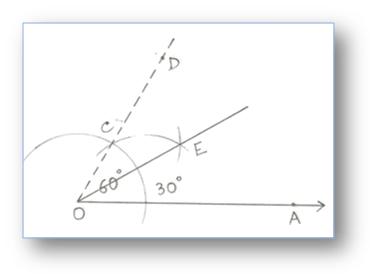
Then, ∠AOD = 30°.
Working Rules to Construct an Angle Measuring 30°.
We have studied to construct an angle measuring 60°. Also, we have studied how to bisect an angle. Now, we would learn to draw an angle measuring 30° by first constructing an angle of 60° and then bisecting it.
Given: AB be the given line with point O.
Step I: Draw a line AB and mark the point O.
Step II: Draw an arc using O as centre cutting \(\overrightarrow{OB}\) at M.
Step III: Now, use M as the centre and \(\overrightarrow{OM}\) as radius, draw another arc cutting the previous arc at N.
Step IV: Join O and N and produce it to form \(\overrightarrow{OC}\).
Thus, ∠COB = 60° is formed.
Step V: Now, taking N and M as centres, draw two same arcs cutting each other at X.

Step VI: Join \(\overrightarrow{OX}\) as it is the bisector of angle ∠COB (which is 60°), and producing it to form ray \(\overrightarrow{OD}\).

Step VII: Now, ∠DOB is the required angle measuring 30°.
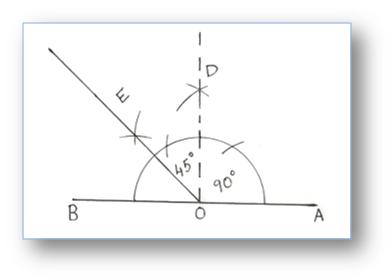
4. Construction of an Angle of 90° by using Compass
Step of Construction:
(i) Take any ray OA.
(ii) With O as centre and any convenient radius, draw an arc cutting OA at B.
(iii) With B as centre and the same radius, draw an cutting the first arc at C.
(iv) With C as centre and the same radius, cut off an arc cutting again the first arc at D.
(v) With C and D as centre and radius of more than half of CD, draw two arcs cutting each other at E, join OE.
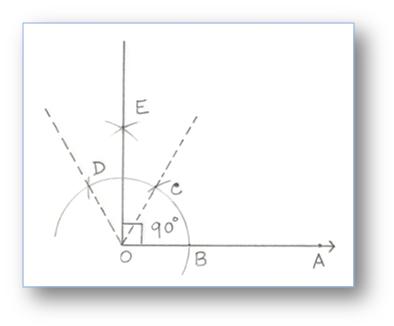
Then, ∠EOA = 90°.
Working Rules to Construct an Angle Measuring 90°.
Step I: Draw a line AB and mark the point O on it.
Step II: Draw an arc using O as centre cutting \(\overrightarrow{OB}\) at M.
Step III: Now, using M as the centre and \(\overrightarrow{OP}\) as radius, draw another arc cutting the previous arc at N.
Step IV: Now, taking N as the centre and keeping the radius same (\(\overrightarrow{OM}\)), mark another arc cutting at T.
Step V: Now, using N and T as centres, draw two arcs of the same radius cutting each other at Y.

Step VI: Join \(\overrightarrow{OY}\) and produce it to form the ray OF.

Step VII: Now, ∠FOB is the required angle measuring 90°.
5. Construction of an Angle of 75° by using Compass
Step of Construction:
(i) Take a ray OA.
(ii) With O as centre and any convenient radius, draw an arc cutting OA at C.
(iii) With C as centre and the same radius, draw an cutting the first arc at M.
(iv) With M as centre and the same radius, cut off an arc cutting again the first arc at L.
(v) With L and M as centre and radius of more than half of LM, draw two arcs cutting each other at B, join OB which is making 90°.
(vi) Now with N and M as centres again draw two arcs cutting each other at P.
(vii) Join OP
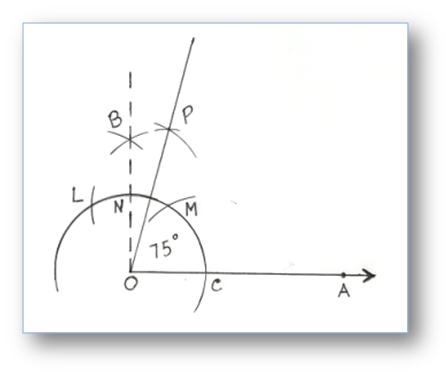
Then, ∠POA = 75°.
6. Construction of an Angle of 105° by using Compass
Step of Construction:
(i) After making 90° angle take L and N as centre and draw two arcs cutting each other at S.
(ii) Join SO.
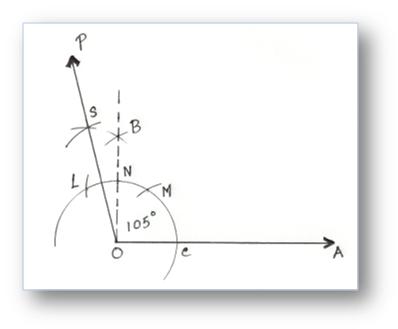
Then, ∠SOA = 105°.
7. Construction of an Angle of 135° by using Compass
Step of Construction:
(i) Construct ∠AOD = 90°
(ii) Produce ∠AO to B.
(iii) Draw OE to bisect ∠DOB.
∠DOE = 45°
∠EOA = 45° + 90° = 135°
Then, ∠EOA = 135°.
8. Construction of an Angle of 150° by using Compass
Step of Construction:
(i) Construct ∠AOC = 120°
(ii) Produce ∠AO to B.
(iii) Draw OD to bisect ∠COB.
Now ∠COD = 30°
Therefore, ∠AOD = 120° + 30° = 150°
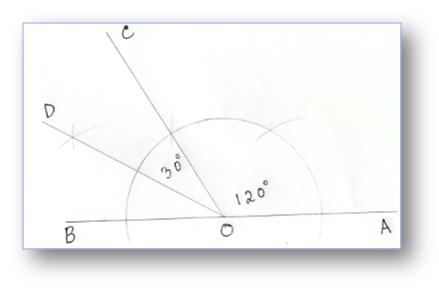
Then, ∠AOD = 150°.
9. Construction of an Angle of 45° by using Compass
Step I: Draw a line AB and mark the point O on it.
Step II: Draw an arc using O as centre cutting \(\overrightarrow{OB}\) at M. Now, use M as the centre and OM as radius, draw another arc cutting the previous arc at N.
Step III: Now, take N as the centre and keeping the radius same (\(\overline{OM}\)), mark another arc cutting at T.
Step IV: Now, using N and T as centres of the same radius, draw two arcs cutting each other at Y.
Step V: Join \(\overline{OY}\) and produce it to form a ray OF, Thus, ∠FOB = 90° is formed.
Step VI: Let OY cut the arc at U. Use U and M as centres, draw two arcs of the same radius cutting each other at Z.

Step VII: Join \(\overline{OZ}\) and produce it to form a ray OG.

Step VIII: Now, ∠GOB is the required angle measuring 45°.
Constructing a Copy of an Angle Using Compass and Straight-Edge:
Let us draw an angle whose measure is equal to that of the angle, say angle ∠ABC.

Step I: With the vertex B as centre and taking a suitable radius, draw an arc to cut the arms BA and BC of ∠ABC at X and Y respectively.

Step II: Draw a ray OQ.

Step III: With O as centre nd BX (or BY) as radius, draw an arc which intersects \(\overrightarrow{OQ}\) at L.
Step IV: With L as centre and XY as radius, draw another arc to cut the previous arc at M.

Step V: Join O and M, and OM is produced to form the ray OP. Now, ∠POQ is the required angle which is the copy of ∠ABC.
● Angle.
Interior and Exterior of an Angle.
Measuring an Angle by a Protractor.
Construction of Angles by using Compass.
Geometry Practice Test on angles.
5th Grade Geometry Page
5th Grade Math Problems
From Construction of Angles by using Compass to HOME PAGE
Didn't find what you were looking for? Or want to know more information about Math Only Math. Use this Google Search to find what you need.


